
0
Owner's of the Kalorik Kitchen Grill Fatless Grill gave it a score of 0 out of 5. Here's how the scores stacked up:

Copies of the I/B. Please reproduce them without any
changes except under special instruction from Team
International USA. The pages must be reproduced and folded
in order to obtain a booklet A5 (+/- 148.5 mm width x 210 mm
height). When folding, make sure you keep the good
numbering when you turn the pages of the I/B. Don’t change
the page numbering. Keep the language integrity. Print only
what is inside the frame.
5 FHG 30035 - 140407
Assembly page 5/32
Fax +1 305 430 9692
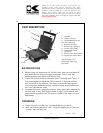
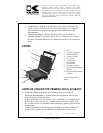
• Position the fat collecting tray near the spout on the side of the
appliance.
• Turn the thermostat knob to the desired temperature level. The
“Max” level is better aimed for searing or grilling meat. For Paninis
or sandwiches, we recommend a medium setting. For reheating,
a low temperature setting is recommended.
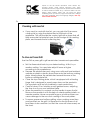
• Preheat the grill to reach the ideal cooking temperature. When
the appliance reaches the desired temperature, the green pilot
light will light up. In order to preheat faster, keep the plates of the
appliance closed. Once the target temperature is reached,
open the grids to avoid overheating of the unit.
• Apply a little oil or a non-stick cooking spray on the cooking
plate if needed. The food can then be placed on the grill.
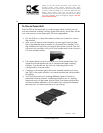
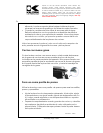
To Use as a Contact Grill
Use the Grill as a contact grill to cook burgers, boneless pieces of
meat and thin cuts of meat and vegetables.
• Set the thermostat knob to your desired setting. At first, try a
setting in the “max” setting. You may later adjust it lower or
higher according to your preference.
• Prepare the burgers, boneless pieces of meat and thin cuts of
meat or other foods as directed and, using oven mitts and heat-
resistant wooden or plastics utensils, place onto the bottom
cooking plate.
• Close the top cooking plate, which is equipped with a floating
hinge that is designed to evenly press down on the food. The top
plate must be fully lowered to achieve grill marks on the selected
foods.
• When the food is cooked, use the handle to open the lid.
Remove the food with the help of a heat-resistant plastic or
wooden spatula. Never use metal tongs or a knife as these can
cause damage to the non-stick coating of the cook plates.
• NOTE: The ribs on the grill plates and the grease spout at the
corner of the plate are designed to allow the grease to drip from
the meat and drain off into the fat collecting tray.


Find Your Products By Category
Please Login
