
3.0
Owner's of the Uniflame Fire Pit Uniflame Uf Lp Gas Column Firepit gave it a score of 3.0 out of 5. Here's how the scores stacked up:


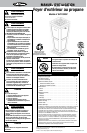
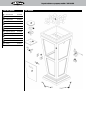

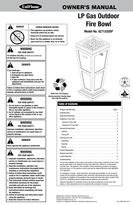
LP Gas Outdoor Fire Bowl Model No. GLT1332SP
Checking for Leaks
W WARNING: Before using this outdoor fire bowl, make sure you have
read, understand and are following all information provided in the
Dangers and Warnings presented on page 2. Failure to follow those
instructions can cause death, serious injury or property damage.
Burner Connections
1. Make sure the regulator valve and hose connections are securely fastened to the burner
and the tank.
Note: If your unit was assembled for you, visually check the connection between the
burner pipe and orifice. Make sure the burner pipe fits over the orifice.
W WARNING: Failure to inspect
this connection or follow these
instructions could cause a fire or an
explosion which can cause death,
serious bodily injury, or damage to
property.
2. Please refer to diagram for proper installation.
3. If the burner pipe does not rest flush to the
orifice, please contact 1.800.762.1142 for
assistance.
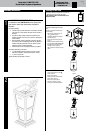
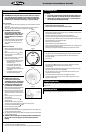
Tank/Gas Line Connection
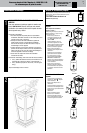
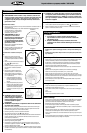
1. Make 2-3 oz. of leak solution by mixing one
part liquid dishwashing soap with three parts
water.
2. Make sure control knob is “OFF
.” (Figure 6)
3. Connect LP gas tank per “Connect LP Gas
Tank” instructions.
4. Spoon several drops of solution, or use squirt
bottle, at all “X” locations (Figure 5).
a. If any bubbles appear remove the LP gas
tank and reconnect, making sure the
connection is secure.
b. If you continue to see bubbles after
several attempts, remove the LP gas
tank per “Disconnect LP Gas Tank”
instructions, and contact 1.800.762.1142
for assistance.
c. If no bubbles appear after one minute,
wipe away solution and proceed.
Lighting Instructions
W CAUTION: Keep outdoor fire
bowl area clear and free from
combustible materials, gasoline and
other flammable vapors and liquids.
W CAUTION: Do not obstruct the flow
of combustion and ventilation air.
1. Make sure all labels, packaging and protective
films have been removed from the grill.
2. Make sure there are no obstructions of airflow
to the gas unit. Spiders and insects can nest
within and clog the burner / venturi tube at the
orifice.
3. Connect LP gas tank per “Connect LP Gas
Tank” instructions.
4. The control knob must be in the “OFF
”
position (Figure 6).
5. Wearing Heat reistant gloves, position the lit
long match or lit long butane lighter near the side of the burner. (Figure 7)
6. Turn control knob counterclockwise to
(HIGH)
.
7. Remove long match/long butane lighter.
8. Turn the control knob to
(HIGH)
.
9. If ignition does not occur in 5 seconds, turn regulator/control knob to “OFF” position, wait
5 minutes and repeat lighting procedure.
10. After lighting, observe the burner flame. Make sure all burner ports are lit and flame height
matches illustration (Figure 8).
W CAUTION: If burner flame goes out during operation, immediately turn
the gas “OFF” and let the gas clear for about 5 minutes before re-
lighting.
Turning Off
1. Turn control knob to the “OFF ” position (Figure 6).
2. Disconnect LP gas tank per “Disconnect LP Gas Tank” instructions and properly store tank.
Operating Instructions
Cleaning and Care
W CAUTION:
1. All cleaning and maintenance should be done when outdoor fire
bowl is completely cool and with the LP gas tank disconnected.
2. DO NOT clean any outdoor fire bowl part in a self cleaning oven.
The extreme heat will damage the finish.
Notices
1. Abrasive cleaners will damage this product.
2. Never use oven cleaner to clean any part of outdoor fire bowl.
Before Each Use:
1. Keep the outdoor fireplace area clean and free from any combustible materials, gasoline,
and other flammable vapors and liquids.
2. Do not obstruct the flow of the combustion of LP and the ventilation air.
3. Keep the ventilation opening(s) of the LP gas tank area free and clear from debris.
4. Visually check the burner flames to make sure your outdoor fireplace is working properly.
5. See sections below for proper cleaning instructions.
6. Check all gas connections for leaks.
7. Check components for any signs of damage or rust.
8. Check and clean the burner/venturi tubes for insects and insect nests. A clogged tube can
lead to a fire beneath the outdoor fireplace.
9. If damage to any component is detected, do NOT operate until repairs are executed.
Cleaning Surfaces
1. Wipe surfaces clean with mild dishwashing detergent or baking soda mixed with water.
2. For stubborn surfaces use a citrus based degreaser and a nylon scrubbing brush.
3. Rinse clean with water.
4. Allow to air dry.
Before Storing
1. Turn control knob to (OFF) and remove LP gas tank, per “Disconnect LP Gas Tank”
instructions. Wait for outdoor fireplace to fully cool (about 45 min.).
2. Clean all surfaces.
3. If storing the outdoor fireplace indoors, disconnect the LP tank (see “Disconnect LP Gas
Tank” section) and leave the LP gas tank OUTDOORS.
4. Place the protective cap cover on the LP tank and store the tank outdoors in a well
ventilated area out of direct sunlight.
5. Cover outdoor fireplace with a durable vinyl cover designed to fit this unit.
6. If storing the outdoor fireplace outdoors, cover the outdoor fireplace with a cover for
protection from the weather.
Product Registration
For faster warranty service, register your product immediately at www.BlueRhino.com or call
1.800.762.1142.
Replacement Parts
Replacement parts can be found at parts.BlueRhino.com or call 1.800.762.1142.
Figure 5
Figure 6
OFF
ARRÊT
Figure 7
Figure 8


Find Your Products By Category
Please Login
