
0
Owner's of the Dimplex Fan CUH05B31T gave it a score of 0 out of 5. Here's how the scores stacked up:
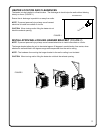

HEATER LOCATION AND CLEARANCES
The heater is to be installed in a fi xed location. The discharge air should wipe the walls without blowing
directly on them. (FIGURE 1)
Ensure the air discharge is parallel to or away from walls.
NOTE: To prevent personal injury always use a licensed
electrician to install new outlets or circuits.
CAUTION: When turning and/or tilting the heater do not
block the exhaust opening.
DISCHARGE
OUTSIDE WALL
FIGURE 1
2
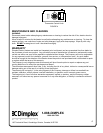
FIGURE 2
INSTALLATION WALL/CEILING HANGER BRACKET (FIGURE 2)
NOTE: To prevent personal injury always use a licensed electrician to install new outlets or circuits.
The hanger bracket allows the unit to be rotated approx 45 degrees in each direction from center, when
attached to wall and tilted in 45 degrees range while suspended from the wall or ceiling.
NOTE: The hardware for mounting the hanger bracket to the wall or ceiling is not included.
CAUTION: When turning and/or tilting the heater do not block the exhaust opening.
ELECTRICAL CONNECTION
WARNING: Consult local electrical codes in addition to the following requirements
1. Turn off main power supply at the electrical panel.
2. Route supply wires from circuit breaker to an approved junction box, located near compact unit
heater. These supply wires must be two conductor non-metallic sheath cable with ground wire. Each
heater should be on an individual, properly fused circuit.
3. Route supply wires from junction box to CUH. These supply wires must be two conductor metallic
sheath (BX) cable with ground wire. Alternatively, appropriate conduit can be used.
4. Remove junction box cover of CUH and remove one knockout hole. Insert approved bushing into
hole and feed wire cable through. Tighten bushing around cable.
5. Make electrical connection to CUH according to relevant wire diagram. Make connections using
approved wire nut connectors and secure the grounding wire to the ground screw on the heater
chassis.
6. Replace junction box cover of CUH.
OPERATION (Setting the Thermostat)
1. Before connecting or disconnecting the plug, turn unit off by turning knob fully counter clockwise. (See
FIGURE 4)
2. Heater is equipped with a thermostat. To adjust temperature to your individual requirements, turn
thermostat control knob clockwise all the way to turn heater on. When room reaches desired
temperature, turn thermostat knob counter clockwise until you hear a click. Leave in this position to
maintain room temperature at this setting. For additional heat, turn clockwise until you hear a click again
and heater will turn on. To turn heater to lowest setting, turn thermostat knob counter clockwise all
the way.
3
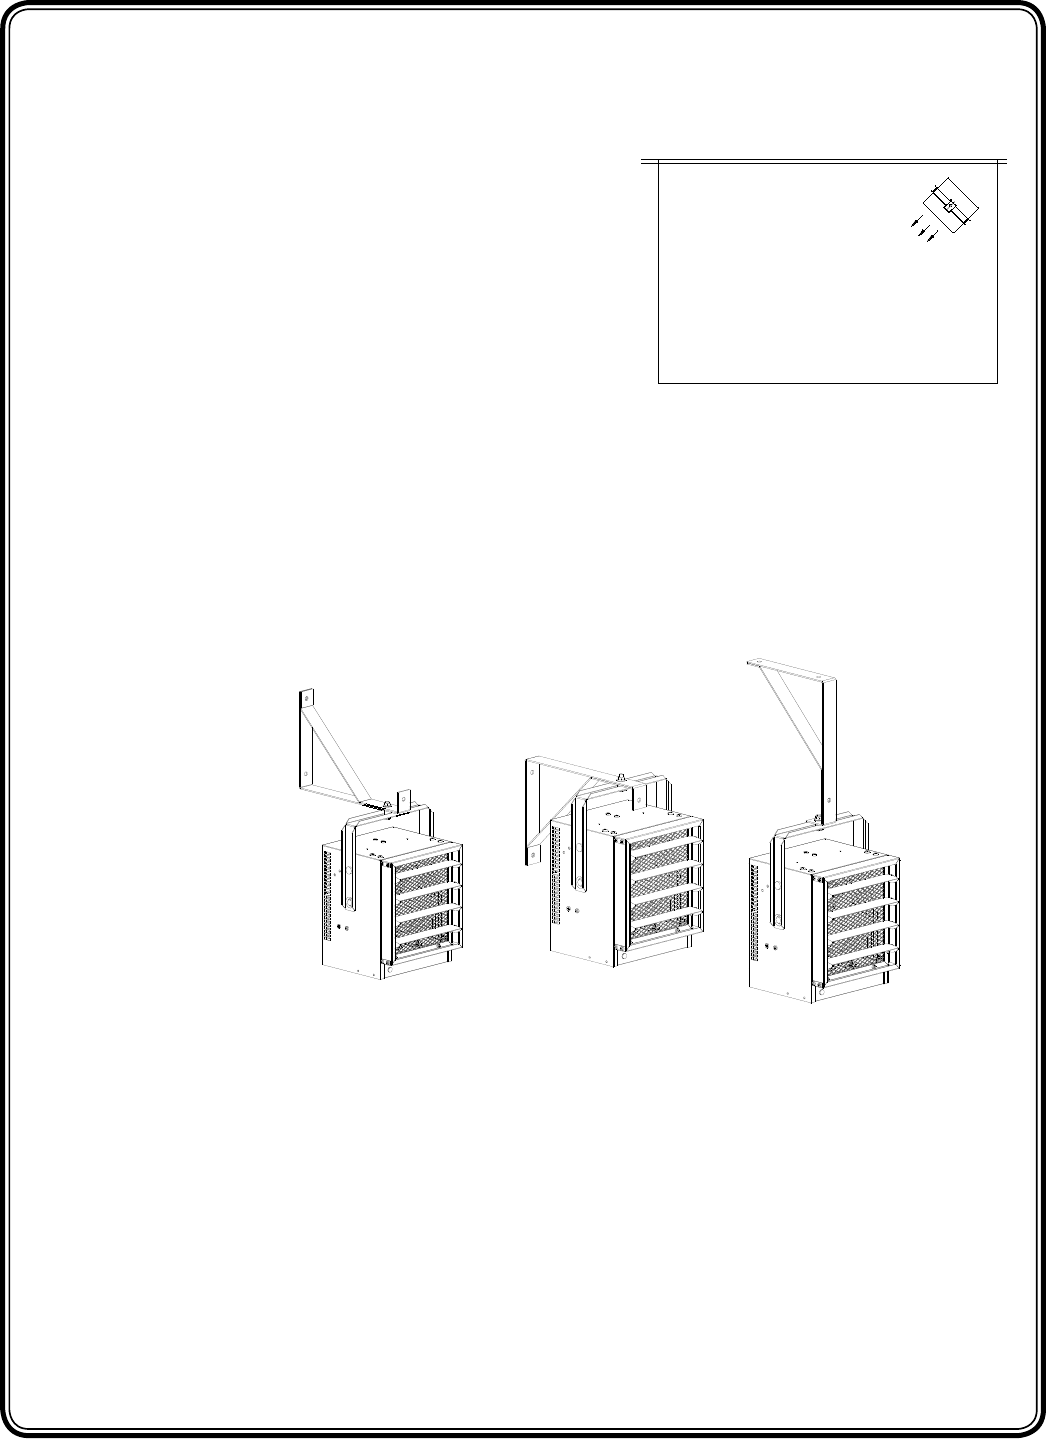
FIGURE 3
The following steps are shown in FIGURE 3:
1. Locate a stud or other suitable support and install hanger bracket on wall or ceiling. Select location so
control knob on back of heater will be reached easily. *
2. Insert carriage bolt into square opening of heater handle.
3. Slide spacer over the carriage bolt shaft and insert in hanger bracket opening and hold them in
position.
4. Slide lock washer and thread on nut onto carriage bolt, turn and tighten with wrench.
* DO NOT INSTALL LESS THAN 6 FEET (1.9m) FROM THE FLOOR


Please Login
