
0
Owner's of the Cuisinart Electric Grill Portable Electric Grill gave it a score of 0 out of 5. Here's how the scores stacked up:
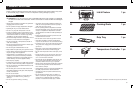
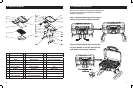

Step 3: Put the Drip Tray to the correct position as shown.
Step 4: Put the temperature controller into the correct position in the frame
as shown. Ensure it is put in all the way.
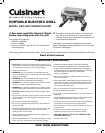
m WARNINGS
• Any modication of the appliance may be dangerous.
• Visually inspect cord, plug and Temperature Controller
for damage and wear before operation.
• When heating the grill for the rst time, it may give off a
slight burning odor. The grill is burning off excess lubri-
cants found on the heating element. This does not affect
the safety of your grill.
• To prevent re or electric shock, always use a certied
electrician should new circuits or outlets be required.
• Improperly grouded outlets could cause electrical shock.
• The use of an extension cord is not recommended. If
you must use an extension cord, use the shortest length
extension cord possible. Do not connect 2 or more ex-
tension cords together. Keep connections off the ground
and dry. Do not let cord hang over edge of table top
where it can be tripped over or pulled by children. Only
use extension cord labeled for outdoor use.
• Cover grill or store in weather protected area when not in
use.
• Clean the grate and cookbox between uses.
– Warning: Do not use the barbecue within 60 cm (24in)
of combustible materials from the back or sides of the
grill. Do not use under any combustible construction.
– Warning: The entire cooking box gets hot when in use.
Do not leave unattended.
– Warning: Keep any electrical power cord away from
any heated surface.
– Warning: Keep the cooking area clear of inammable
vapors and liquids such as petrol, kerosene, alcohol,
etc., and other combustible materials.
– Warning: When cooking, the appliance must be on a
level, stable surface in an area clear of combustible
material.
– Warning: Keep cord clear of cookbox.
Dangers
– Place the grill on a stable, non-combustible surface
– Do not use indoors, or in a recreational vehicle or on a
boat
– Ensure temperature controller is plugged fully into grill
before proceeding
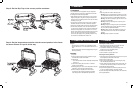
COOkING
1) Open lid
2) Ensure cooking grate is properly positioned in grill,
and that rebox is free from debris.
3) Preheat grill
– Turn knob clockwise to MAX. Red light indicates that
power is on.
4) Close lid and allow grill to heat for 5-10 minutes
(longer in clod weather)
5) When beginning to cook, a lower temperature may be
selected by turning knob counterclockwise.
6) When cooking is complete, turn knob counter
clockwise to OFF. Unplug temperature controller.
See storage section for additional requirements.
Cleaning the outside surface:
1. Wipe surface grime off with a clean cloth and mild
dishwashing detergent or baking soda.
2. For stubborn surface dirt, use warm soapy water
solution and a nylon scrubbing brush.
3. Clean the rinse with water.
4. Allow surfaces to dry fully before use.
Cleaning the Heating Element:
1. Ensure the grill is unplugged from the power source and
the temperature control unit is removed.
2. Remove the cooking grate.
3. Remove the heating element by unscrewing the wing
nuts and lifting the element out.
4. Gently clean the heating element with a damp cloth. Do
not scratch the element’s surface or immerse in water.
5. Reinstall the heating element.
6. Inspect the temperature controller and the power cord
for by any possible damage, and then reinstall.
Any other servicing should be performed by an authorized
service representative.
5. WARNINGS
6. OPERATING INSTRUCTIONS
7. CLEANING
8
9


Find Your Products By Category
Please Login
